Porcelain paving is a premium paving choice and it should be laid correctly to produce the best possible results. You’ve taken your time to select a lovely paving surface you should do it justice by making sure it’s installed well. With this in mind we do recommend that your paving is installed by an experienced professional and this article acts as guidance as to the best practice when laying our porcelain paving tiles.
Firstly there’s no need to be apprehensive when laying porcelain for your patio. When laid well it will provide a beautiful outdoor space for decades that will be relatively easy to clean and maintain. Throughout this guide we’re going to cover the whole process of creating your porcelain patio from preparing the sub-base to finishing the job off with the right grout.
Porcelain Paving Build Diagram
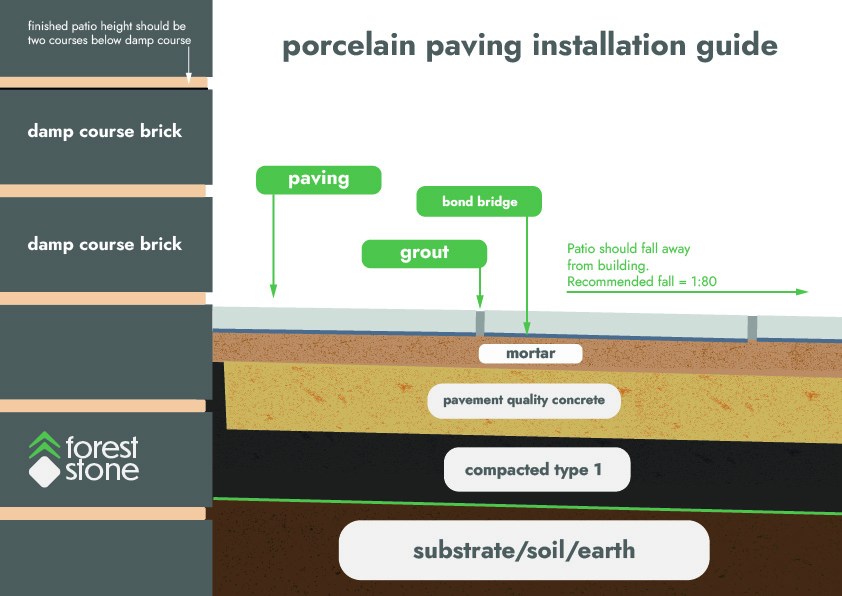
Recommended Measurements
Mortar Depth = 30mm approximately
Pavement Quality Concrete (PQC) Depth = 100mm approx
Compacted Type 1 Sub-base = 100mm approx
Materials
Pavement Quality Concrete (PQC) = 6/1 | Ballast/Cement or purchase pre-mixed concrete to PQC spec
Mortar = 4/1 | Sharp Sand/Cement
Bond Bridge = Buy a ready mixed porcelain primer or mix one using SBR
Grout = Use purpose made outdoor porcelain grout (Ultratile ProGrout, Mapei, Ardex, Fugabella or similar standard of product). Do not use coarser grouts intended for stone – they tend not to look right.
Preparation & Sub-Base
Before reading this section take a quick look at the diagram above and the measurements – it’ll help you understand the process as we discuss preparing your area that’s going to be paved with porcelain. As you can see from the measurements listed you’ll need to dig out the ground approximately 200mm plus the thickness of your paving in order to have it ready for the sub-base to be put in. The sub-base is all important as this will provide the strength for your patio for years and hopefully decades to come. Take shortcuts here and it could lead to issues later down the line for your project. After digging out you’ll need to lay down some kind of membrane between the substrate (earth or whatever material is in your build space) and what will become your sub-base. This is simply to provide a barrier so that your sub-base does not move and sink into the substrate over time. On to the barrier you install a compressed 100mm of Type 1 Scalpings. You can buy these from most local builders merchants or aggregate suppliers – buying them loose tends to work out the best deal but as these are a cheap product try to use your most local supplier as they’ll generally be cheaper (due to the haulage). These scalpings need to compressed using something like a wacker plate. On to the scalps you need to pour a pavement quality concrete (PQC) layer of around 100mm thick. This is preferable to laying porcelain on scalpings and mortar only as the concrete will provide a rigid base with no flex at all. Porcelain tiles do not flex so they are happiest on a rigid platform which the PQC provides. Please note though that it is not recommended to have the PQC connect to the house as this can interfere with damp in the bricks and the foundation of the property. It’s best to install drainage channels here or use something permeable and/or flexible in the area immediately adjacent to any brick or concrete block building.
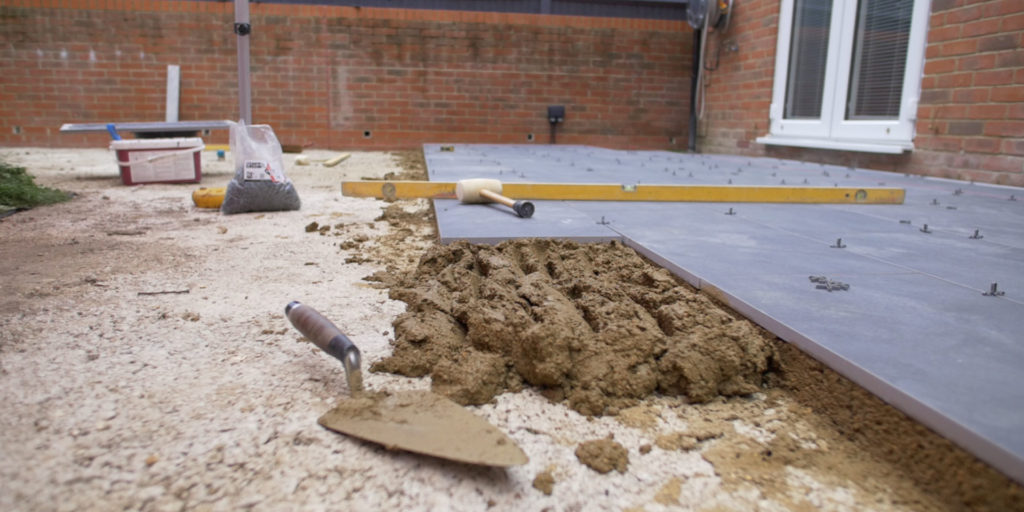
Bedding & Laying Your Porcelain Paving Slabs
It’s starting to get real now – you’re ready for the phase where the project comes to life and you get to lay all those nice porcelain slabs you’ve bought. You bed them down onto a mildly wet mortar mix (check out the photo above for the consistency you want) that is around 30mm deep. Tap the tiles down carefully with a rubber mallet and ensure they are level in line with the way you want the patio to fall (it’s best to mark this out with string lines before laying your paving). You should also always use spacers with porcelain paving to ensure all the pointing gaps are equal and looking crisp – generally with this type of paving we recommend a 5mm space between pavers. There’s one important thing you need to remember when bedding porcelain tiles, well actually there’s two things;
- Always use a bonding or priming slurry on the back of the tiles – they will not adhere to the mortar if you don’t as they have a very low porosity (that’s why they’re pretty easy to clean).
- Always use the arrow. You may be thinking what the hell are they talking about. But all our porcelain paving has an arrow on the back of the tile somewhere. Depending on the factory and the batch run it could be very subtle, sometimes it’s quite obvious but it will be there. The arrow tells you which direction to lay the tile in relation to the other tiles. For best results lay all the tiles with the arrow facing the same way relative to each other. That way your patio fall and drainage will work best.
Can I Dot & Dab or Spot Bed My Porcelain Paving?
No. Don’t do it. We don’t recommend this at all – regardless of the paving choice dot and dab or spot bedding where a few blobs of mortar are tasked with adhering the paving to the sub-base is always a bad idea. Not only does this not save a huge amount of time or money (certainly in the long run) it gives rise to lots of problems with your paving aesthetically and structurally. Structurally it means there are voids underneath the paving and it’s not supported by the sub-base, this will mean the slab is much more likely to come loose. There is an additional side effect of your jointing material not being able to adhere to anything underneath the slab – you’ll waste a lot of grout just trying to fill these voids! Always lay porcelain paving on a full bed of mortar or adhesive.
Can I Use Exterior Grade Tile Adhesive to Bed My Porcelain Paving?
Absolutely. If you have a lovely level concrete base and are comfortable working with tile adhesive an exterior grade tile adhesive and a grooved comb are a perfect combination for laying outdoor porcelain tiles. In this regard it’s a bit like laying an internal floor – just with external grade materials.
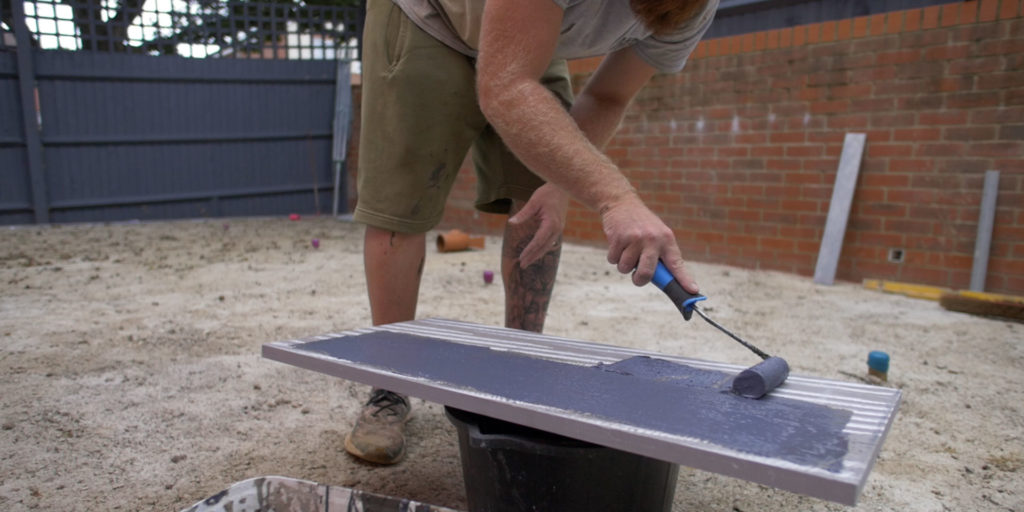
Using A Bond Bridge or Paving Primer When Bedding Outdoor Porcelain
A bond bridge or paving primer is absolutely necessary when laying porcelain paving. There porosity is so low that they do not draw enough moisture in to stick to regular mortar like a natural stone slab would. There are lots of products you can use to create your bond bridge and to be honest, when used correctly, they all perform similarly. You can purchase ready made priming slurries from us here at Forest Stone or you can buy SBR and mix this with cement to create your own primer – always follow the instructions of the manufacturer when going this route as they do differ from each other. Generally the texture of your primer or bonding slurry needs to be like that of a thick milkshake. It’s best applied to the back of the tile just before laying with something like a small roller – like in the picture below. Be very careful at this stage not to get any primer on the top surface of the pavers as it’s very difficult to remove once there. If you do have a spillage wipe it off with a clean wet cloth straight away.
Laying Styles
Your options;
- Stretcher Bond or Brick Bond – this is where the tiles are laid in rows where the row above and below have a paving join half way across the row inbetween. This is known as brick bond as it’s the same method as laying a brick wall. Also known as ‘half-bonded’.
- Third Bonded – many factories recommend this with porcelain tiles due to the fact that many of them are very slightly lower in the middle than they are at their edges. Third bonding is similar to stretcher bond except the grout join of the subsequent row appears a third of the way along (instead of half).
- Stack Bonding – this is where tiles are laid with all the joins in line – like a chess board. A very geometric and clean modern style.
- Modular – if you’ve bought paving that is supplied in several sizes then it will likely require you to follow a modular pattern. Generally with this style the laying is all about using the sizes supplied evenly without creating ‘cross joins’ that are this shape +. Instead you’ll want all the paving joins to be ‘T’ junctions. Some products may come with a laying pattern from the manufacturer so be sure to check for that before installing.
- Decking – if you’ve selected a plank sized porcelain paving tile or something that looks like wooden decking you might want to have it laid end to end in consecutive rows. In this instance the slabs are laid one after another in rows without a care for where the joints of the previous row are. When you get to the end of the row you simply cut that slab and use the off-cut to start the next row. This is very efficient and ensures minimal wastage but it also apes the look of decking on a ship which can be quite pleasing on the eye.
Ultimately this is down to personal taste and the aesthetic you want to achieve. It also depends on the tile design you’ve gone for and how it matches up to your house. If you’re looking to create that ‘inside-outside’ flow you’ll want to match the laying style of your interior. If you’ve gone for a wood look porcelain tile then the decking laying style is probably most suited to your project. Stretcher Bond is probably the most common laying style with porcelain paving and it generally works well with all tile designs and garden design schemes. If you have a defined idea about how you want to lay your porcelain but are unsure as to if it’s suitable for the tiles you’ve bought you can always contact one of our knowledgable sales team and we’ll be keen to advise you.
What Grout Colour Should I Use?
This really does depend on the finished look you’re trying to achieve. Generally a lighter coloured grout will make the whole paved area feel lighter and a darker grout will do the opposite by bringing how your eye sees the paving to a darker perceived colour. If you’re looking for a coastal, airy, beachy feel then you may want to go for a light grey or even beige grout. If you want a more striking look and have dark coloured slabs you could go for a black or a very dark grey. We always say if in doubt go for a cement grey grout – it looks brilliant with almost every tile design and will not show up dirt like a lighter grout would. Take a look at the porcelain grout colours we stock here.
Porcelain Paving Joints & Grouts
It seems that many contractors have a favourite grout they use. In most cases this is about their own personal work-flow and how they are accustomed to working with it. We’d always recommend you go for a porcelain specific outdoor tile grout. A product from an industry leading company like Ultra TileFix’s ProGrout Flexible is something we’d recommend. Do not use coarser grouts designed for natural stone paving as these just look odd next to the cleaner look and surface texture of porcelain. A grout from a company like Ardex, Mapei, Fugabella, Ultrascape will usually be of very good quality and you can’t go wrong if using products from these brands correctly. As with all materials like this be sure to follow the manufacturers guidelines and instructions on how to use it for best results – the process may differ from brand to brand. When working with outdoor porcelain tile grout they’ll be some minimum and maximum working temperature and weather requirements that you should adhere to in order to get the best results – again refer to the manufacturer’s literature for guidance on this. For grouting you’ll likely need a period of dry weather too as most grouts are disturbed by rain and do not cure properly. You should mix the grout as per the manufacturer’s guidelines and be sure to do this consistently with each batch to get consistent results. Once mixed the grout should be a thick paste like substance – you’ll probably have only around an hour to use this paste until it becomes unworkable so work in small sections. Use a squeegee or some kind of purpose made grouting tool to work the grout thoroughly into the joins. Again use suitable grouting tools to compact the grout into the joins and create a smooth, full finish. Try to work as neatly as you can but it’s inevitable you’ll be leaving grout residue and spills on the paving surface – this is quite normal. However as you work sections wipe excess grout off of the paving surface and try to clean any spills as you go- be aware that quality porcelain paving has a grip texture to it and this can pull fibres from some cloths so use something that isn’t going to leave pieces of fluff and fibre behind. After the grout has started to set and harden you’ll need to carry out an additional clean of the paving’s surface and specifically the areas near the joins. Here you may want to use a cleaning chemical to aid the process – something like Lithofin Intensive Cleaner is ideal in this situation but be sure not to get any of the cleaner into the grout before it has fully set. When cleaning grout that hasn’t fully hardened be careful to work diagonally across joint lines without too much pressure so as not to disturb them. Again use of a non-fibrous cleaning cloth or sponge is needed here. Protect the grout from getting damp for 24 hours or so to enable it to fully cure.
Grout Hazing – Carry Out a Final Clean With a Grout Haze Remover
Once the grout is cured you may find there is some grout hazing across the patio area affecting its look and the colour of the tiles. It happens more often than not so it’s best to budget for a final clean of the whole area at this stage using something like Lithofin KF Cement Residue Remover.
Do I need to Seal Porcelain Paving?
Luckily porcelain paving is very good at resisting water ingress and stains as it is nearly impermeable with very low water absorption. Therefore sealing them is absolutely not required and it’s part of the beauty of having a porcelain patio – ongoing maintenance is pretty much regular cleaning and that’s it! These slabs won’t fade either, like some natural stones, so you know that if you look after them they’ll keep looking lovely for ages. However your grout is permeable and does tend to dirty up and stain over the years. You can seal your grout joins to help prevent this and make them easier to clean. Using something like Lithofin MN Stain Stop is ideal for this. When sealing your grout joins you’ll want to use an accurate sprayer or paint brush to ensure you aren’t wasting too much sealant and it’s being applied to the grout joins only.